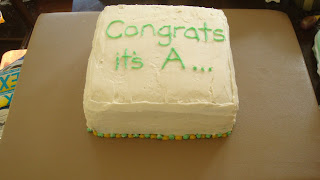
I bet by now you are thinking that something went terribly wrong during the baby gender reveal cake that has kept me from updating? No. not really. I think it went pretty darn good. The cake itself was Delicious if i do say so myself and the butter cream was Delicious too, the decorating part... welll... that was aiiiight. I mean I did the best with the tools that i had, which weren't many.
So on Friday after eating dinner and send Juju off to hang out with the guys i started baking the cakes. I gathered all my ingredients and invaded my MILs kitchen, since my oven largely resembles an easy-bake oven. I spent the last few days leading up to the cake i was searching for a basic cake i could add pineapple filling to it.
I decided on a classic vanilla cake, pineapple filling and vanilla butter cream. I followed the recipe from Annie over at
Annie's Eats She made them cupcakes as you can see, but the recipe and instructions ( minus the baking time ) work just fine. Since I'm still a rookie, I copied her ingredients/instructions below.
Vanilla Bean Cupcakes
Ingredients:
3 cups cake flour
1 tbsp. baking powder
½ tsp. salt
1 vanilla bean, split lengthwise
16 tbsp. unsalted butter, at room temperature
2 cups sugar
5 large eggs, at room temperature
1¼ cups buttermilk, at room temperature
1 tbsp. vanilla extract
Directions:
Preheat the oven to 350° F. Line two cupcake pans with paper liners. Set aside.
In a medium mixing bowl, combine the cake flour, baking powder and salt. Whisk together and set aside. Add the butter to the bowl of an electric mixer fitted with the paddle attachment. Scrape the vanilla bean seeds into the bowl of the mixer with the butter and discard the pod (or reserve for another use.) Beat on medium-high speed for 3 minutes, until light and creamy in color. Scrape down the sides of the bowl and beat for one more minute.
Add the sugar to the butter mixture, ¼ cup at a time, beating 1 minute after each addition. Mix in the eggs one at a time until incorporated. Scrape down the sides of the bowl after each addition. Combine the buttermilk and the vanilla extract in a liquid measuring cup. With the mixer on low speed, add the dry ingredients alternately with the wet ingredients, beginning and ending with the dry ingredients and mixing just until incorporated. Scrape down the sides of the bowl and mix for 15 seconds longer.
Divide the batter between the prepared paper liners, filling each about 2/3 of the way full (you will likely have batter left over after filling 24 wells.) Bake 18-22 minutes, or until a toothpick inserted in the center comes out clean. Allow to cool in the pans 5-10 minutes, then transfer to a cooling rack to cool completely. Replace paper liners and bake remaining batter if desired. Frost cooled cupcakes as desired.
My Adventure:
*I made the cakes on Friday night. I followed the instructions above to the T. The only semi sorta problem that i encountered was after mixing the ingredients, dry/wet/dry/wet/dry, i stopped the mixer to prepare the cake pans, when i returned to the cake mix, it seemed to be separating. So i quick turned on the mixer again, tried whipping it up to the int ital consistency. I maneuvered the bowl to get air back into the mixture and although it did come together it wasn't the original consistency. That worried me.
*While baking, my edges started browning too fast. And since the cake itself was colored, it looked very odd. next time i will ensure i prepare the pans with parchment paper, i used butter and flour. rookie mistake
*I let cake cool in the pan OVERNIGHT. And i shouldn't have. The next morning i didn't have a problem getting it out at all, but i feel it did affect the cake a smidge.
Here are a few pictures of the process. I think I can put this one down in the books as a success.
First came the crumb coating. Since I crumb coated both layers, i kept them both cold in the fridge to ensure none of the colored crumbs were visible.
The filling was pineapple, I had to make the filling twice since the first time around, while trying to thicken the filling i began making "dough dumplings" because one person can only sift and stir fast enough.
I didn't spread the filling all the way to the edges, while researching proper filling techniques, i learned that the weight from the top layer will cause the filling to fall out of the cake if its too close to the edge.
Here is the cake crumb coated, filled and layered.
Here is the cake with the butter cream frosting. I know it looks a little rough, but i "wanted" it that way ;-)
Neutral green and yellow decoration dot thingies.
Another view. I wanted to add "more" to the cake, but being a rookie and all, i didn't want to mess up the "good" thing i had going already. And i didn't want it to look like too much. I wanted a simple cake that would serve its very important purpose.
I have to work on my cake writing technique, i never knew i had such a shaky hand!
Oh and if your wondering what the gender is.... Well your going to have to keep'on waiting, Gaby has yet to forward me a picture of the cut cake. blame her.


